Ok, it’s official. I’m going to add my papercrafting blog entries here too. I bounced the idea about of keeping them on a separate blog in case I ever get onto a design team or whatever (yeah, right!) so that possible offense to readers can be avoided by them never seeing the fact I’m pagan and that I blog on the subject occasionally. Or that my opinions are freely voiced on my blog (isn’t that what a blog’s supposed to be for anyway?) and I don’t tend to hold much sacred. Literally. *Cheeky grin*
Ultimately though, I decided to keep the paper crafting stuff here too, because like my description blurb says, it’s about my life, my beliefs and so on. My life includes prosaic stuff like making cards and scrapbook pages, so as far as I’m concerned, it’s just one more pointer towards that pagans/witches ARE the people next door/the people in your craft class etc.
I also decided that I would work in metric measurements (millimetres and centimetres), because that’s what we use here in New Zealand. It’s going to mean having a fast link to a measurement converter program, I’m sure, but the whole inches thing boggles my mind – which spends enough of it’s time boggled, thank you very much!
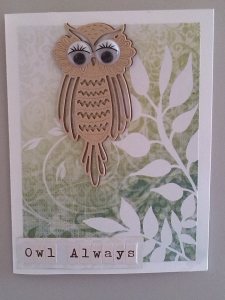
So, here we have Paper and Glue #1: Owl themed anniversary card.
Designer Paper: Kaisercraft Chapter One Collection; Flourish (P667) from my stash. You should only need one 300x300mm sheet of your chosen paper.
Owls: Core’Dinations sampler pack from a magazine, dark brown and a glittery sandy colour.
Dies: Tattered Lace Owls Toppers die set; TLACD030 ( www.topdogdies.com )
Rub On Sentiment: Kaisercraft; Forever
Alphas: Typeface stickers from stash
Puffy Hearts + Rhinestone: from stash
Start off with a piece of cardstock 350mm x 165mm. Score at 125mm and 250mm. This should leave you with a 100mm section on the other end. Fold and crease, putting the shorter side to the inside. This forms your card blank.
Cut the designer paper for your background:
3 pieces; 110mmx150mm (or smaller/larger if you prefer, I left quite a wide border on mine with these measurements)
1 piece: 85mmx150mm (or smaller/larger if you prefer, I left quite a wide border on mine with these measurements)*
1 length of the trimmed decorative bottom strip of the paper, 150mm long*
* = You could cut 2 pieces of 85mmx150mm and omit the strip if you prefer. I tend to scrawl hugely, so wanted a good amount of blank paper space to use.
Die cut the owls:
Once from the darker brown and once from the glittery sand coloured Core’Dinations. Using a glue pen (or a very steady hand with a bamboo skewer and craft glue!) adhere the lighter shade to the darker, off setting very slightly to create a shadowed effect.
Add googly eyes to the owls and ensure the cat isn’t wearing one on his rear as he leaves his supervisory position.
Create the sentiment labels/tags using plain scrap card and some of the scraps from the Flourish paper as a background. Trim to desired size/shape.
Assemble the card:
Adhere 2 pieces of the 110×150 on both sides of the front panel, the final piece goes on the centre panel.
The 85×150 goes on the outward facing panel of the smaller section (the optional second piece would go on the other side of same if you were doing it that way) and the strip goes along the outside border edge on the inward facing panel of the smaller section.

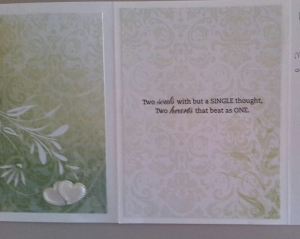
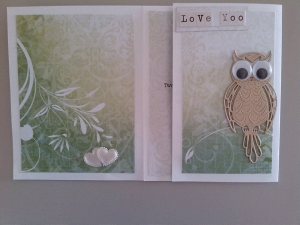
Middle of card, fully opened, showing the rub on sentiment – the quote from our wedding stationery. Puffy hearts and rhinestone on right side, which is the back panel of the larger front flap (owl 1)
Position the owls using foam dots or 3D glue on the front panel and the smaller inside panel.
Position and adhere sentiment tags. Make sure the cat is again well clear of anything that might stick to him.
Centre the rub on inside the card and apply. Add a little bling where it suits you.
Add your own words/thoughts etc on the blank panel.
Voila! The photos don’t show the greens of the Flourish paper terribly well, but take my word for it, the colour is lovely, and the vegetation prints on it inspired the idea of having the owls perched on it.
Oh, and random cat mentions? Gandalf likes to supervise. This leads to moments of inky paws, fur in the double sided tape and googly eyes on furry bums. But it’s all part of the fun!


That’s so lovely 🙂 Our first wedding anniversary is coming up so I’ve got plans to make an origami card for hubby. I currently write two blogs, one pagan and one craft but the pagan side gets sadly neglected when I’m super busy. I’ve thought about combining the two so I’ll be keeping an eye on what you’re up to and would love to hear how you’re finding things. BB
Hi Vix! Congrats on the first wedding anniversary!
I really agonised about having 2 blogs, because when I recently applied to be a part of a design team for a local papercrafts supply shop, I have a feeling that the pagan side of the blog might have had a small part to play in missing out. Granted, I’m still a learner (and freely say I always will be!) but as someone who checks design team contributions on blogs etc, something done by a beginner rather than an advanced expert seems to me something that would be less intimidating to try and emulate LOL!
So far, things are going OK with the combination, I’ve not had complaints or ‘go blog something pagan for a change!’ calls, but given how haphazard my blogging can be, I don’t foresee that happening.
Free advice? Combine the two. Both are part of you the person after all. But again, I’m only able to offer that advice as a person who’s so out of the broomcloset they might as well name a town after me and who has reached a point in her life where splitting parts of myself off seems an unhealthy thing. Spent too long doing that and suffered for it, you know?
Get blogging! I miss reading more!
(So says the woman who’s responding to your note a month after the fact… sorry for that)